Hochzeitskarte und Minibuch

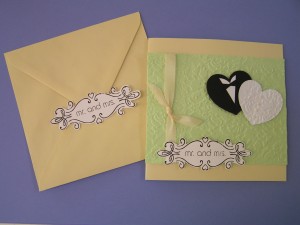
Meine frühere Kollegin Nadine hat am Wochenende geheiratet. Von den Kollegen gibt es ein Sparschwein mit Geld. Die Karte, die wir dazu übrreichen, habe ich „abgekupfert“ – ich habe schon öfter solche Karten mit Herzen im Brautpaar-Look im Netz gesehen, vor allem bei den Splitcoast-Stampern. Leider habe ich keine speziellen Seiten gespeichert, bei denen ich das seinerzeit mal gesehen habe. Von daher Dank an unbekannt für die Idee und die Inspiration!!!

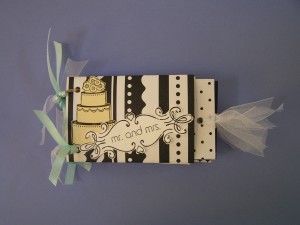
Zu Karte und Sparschwein gibt es von mir noch ein Minibuch zum Selbstgestalten. Dazu habe ich ein „Klorollen-Buch“ gefertigt, eine Technik, die ich auf einer Messe bei der Kreativwerkstatt Langhammer aus Mörfelden-Walldorf gelernt habe. Die Seiten sind mit schwarz-weissem Papier beklebt, ebenso die Anhänger, die in den „Taschen“ stecken. Gebunden ist das Büchlein mit Buchringen, in die Bändchen geknotet sind. Zum Buch bekommt Nadine ein Tütchen mit „Journaling Tags“, Sprüchen und Spruch-Tickets, die schon mit Doppelklebeband versehen sind. Damit kann sie sich das Büchlein dann selbst gestalten.

***

My former colleague Nadine got married on Saturday. She’ll get a piggyback filled with some money from our team. The card I made to accompany the gift is „cased“. I have seen cards with 2 hearts dressed as a bridal couple quite a number of times on the web, especially on Splitcoast stampers, I think. Unfortunately, I did not save any specific sites. Thus I can only credit the „unknown stamper“ with the idea! Thanks to you, whoever you are!

To go with the card and the gift, I also made a minibook Nadine can complete herself. It is made from Toilettepaper-rolls, a „technique“ I learned in a workshop from Kreativwerkstatt Langhammer. All pages are done with black and white paper. The binding was done with bookrings that were decorated with some ribbon. in addition to the minibook, Nadine will receive a little bag with journaling tags and sayings. I already covered them with double-sided tape so she can use them like stickers on top of the pictures she’ll add.

Noch ’ne Geburtstagskarte und ein Lesezeichen

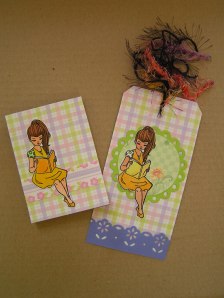
Etwa eine Woche vor meiner Mama hat meine Freundin Hannelore Geburtstag. Für sie gab es eine eher schlicht gehaltene Karte (die meisten meiner Freundinnen haben es nicht so mit fusseligen Karten) und ein Lesezeichen. Auf beiden ist Willow vom Whiff of Joy-Set „Fun in the Sun“ in ihr Buch vertieft. Auch die Sandburg stammt aus diesem Set. Papiere von LaBlanche, die Stanzteile wurden mit einer Tim Holtz- Stanze gestanzt. Ausgemalt wurde alles wieder mit Copics.

Die verschmierten Farben bei Willow auf der Karte kommen daher, dass ich am Liebsten das Brilliance-Stempelkissen „Graphit black“ benutze. Das ist aber so gar nicht zum Ausmalen mit Copics geeignet, sie lösen die Farbe wieder an. Mittlerweile nehme ich Memento-Stempelkissen für Motive, die ich mit Copics ausmalen will.

***

My friend Hannelore has her birthday roughly a week before my Mum. For Hannelore, I made a rather simple card and a bookmark as well. Actually, most of my friends aren’t the type for fancy cards. – Both card and bookmark show Willow from Whiff of Joy, completely absorbed in her book. The sandcastle is also from Whiff of Joy, from the same kit „Fun in the Sun“ from 2010. Papers used were from LaBlanche, dies from Tim Holtz and everything was coloured with copics.

The smeared colours you see on Willow on the card come from using my favourite stamppad „Graphit black“ from Brilliance. You should not use that with copics, as they dissolve the ink. By now, I try to make sure to use Memento-stamppads for images I want to colour with copics.

Geburtstagskarte nach WOJ-Challenge #105 und Mini-Set

Diese Geburtstagskarte habe ich für meine Mama gebastelt, nach dem aktuellen Sketch von Whiff of Joy:

Der süße Kleine ist natürlich von Whiff of Joy, aus dem Sommerkit 2009. Ausgemalt habe ich ihn mit Copics. Das Schattieren gelingt mir noch nicht so ganz, aber mit dem „ausgewaschenen Blau“ der Hose z.B. bin ich schon ganz zufrieden. Der Spruch ist auch von Whiff of Joy und die Papiere sind, glaube ich, alle von LaBlanche. Alles Gestanzte ist mit Spellbinders und der BigShot ausgestanzt.

Ich habe mich auch mal wieder an der Innenseiten- und Umschlag-Gestaltung versucht, wie immer sehe ich die Ergebnisse mit gemischten Gefühlen – o-kay, aber… *smile*

Zum guten Schluss gab es auch noch ein Mini-Set für meine Mama, ein aufgepepptes Notizbüchlein und ein Lesezeichen. Auf beiden kam ein weiterer Whiff of Joy-Stempel zum Einsatz, diesmal aus dem Set „Fun in the Sun“ aus 2010.

Die Rückseite des Lesezeichens ist sehr schlicht gehalten, den Spruch habe ich aus dem Werbekatalog von „Jokers Restseller“ ausgeschnitten:

Basis für das Lesezeichen war meine heißgeliebte Tim Holtz-Anhänger-Stanze, mal wieder kostengünstig aus gebrauchtem Karton gestanzt (alter Kalender ohne Motive, wenn ich mich recht erinnere).

Noch eine komplett andere Bemerkung am Rande – ich wäre nie auf die Idee gekommen, grün und lila zu kombinieren (naja, evtl. zu Halloween). Zufällig lag das Mittelteil der Geburtstagskarte, also das auf lila geklebte Karopapier, auf der grünen Karte. Ich dachte: „Wow, das passt ja!“ Mir gefällt die Kombination aus dem frischen Grün mit dem nostalgischen Lila. Wer hätte das gedacht?

***

I made this birthday-card for my Mum, using the current sketch-challenge at Whiff of Joy for inspiration.

The sweet little boy is, of course, a Whiff of Joy stamp, from the summer kit 2009. I coloured him with copics. I haven’t got the hang yet on how to do proper shading,  but I am moderately pleased with the washed-out look of the trousers. The saying is also from Whiff of Joy and all of the papers are from La Blanche, I think. All die-cuts used on this card  are from Spellbinders.

I also tried my hand at decorating the inside of the card and the envelope. As ususal, I view the outcome with mixed feelings. It is o-kay, but… *smile*

Last, but not least, I made a mini-set for my Mum. A „pimped“ little notebook and a bookmark. Both show another Whiff of Joy stamp, this time from the „Fun in the Sun“ Kit 2010.

The backside of the bookmark is clean and simple, I added a saying I cut out of a bookseller catalogue.

The base for the bookmark was my beloved Tim Holtz-tag-die and I was beeing frugal again recycling an old calendar (without images).

On a completely different note, I would never ever have combined green and lilac on a card. By accident, I laid the layered square from the birthdaycard (that is, the checkered paper mounted on lilac cardstock) on a green card and thought: „That works!“. I actually like the fresh look, which I attribute to the green colour, and the slightly sweet and nostalgic feel I attribute to the colour lilac. Who would have thought?

Geburtstagskarte und Gutschein

Meine beste Freundin hatte am Donnerstag Geburtstag. Als Geschenk gab es einen Gutschein für einen TagesausFLUG zu einem europäischen Ort Ihrer Wahl – in Form eines „Tagbooks“.
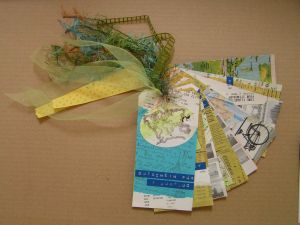
Zusammengehalten werden die Tags von einem Buchring, in den ich Garn und Bänder geknotet habe.

Ich habe mit der Tim Holtz-Stanze große Anhänger ausgestanzt und jeweils auf einer Seite eine Collage  mit Reise-Themen aufgeklebt. Auf die andere Seite kam einfarbiger Karton. Ich hatte vorab für eine ganze Reihe von Städten herausgesucht, wann der jeweils erste und letzte Flug geht, wie lange der Transfer vom Flughafen in die Stadt braucht und wie lange man somit Zeit hat, sich die Stadt anzusehen. Diese kleinen Übersichten habe ich ausgedruckt und auf die einfarbige Seite der Anhänger geklebt. Es waren so ca. 8-9 Orte, bei denen auch an einem Tag genug Zeit zum Bummeln bleibt – von B wie BCN (Barcelona) bis V wie VIE (Wien).

Als Grundlage für die Anhänger habe ich Kartonverpackungen aufgeschnitten und gestanzt, in dem Fall waren es Grissini-Verpackungen. Ich hebe (große) Karton- verpackungen gerne für solche Zwecke auf. Leider sieht es manchmal in der Bastelecke aus wie in einem Altpapier-Container, aber ich freu mich jedes Mal, wenn ich „umsonst“ Material habe. – Geht Euch das auch so? Sammelt Ihr auch alles, weil man es noch mal verbasteln kann? Also, ich laufe da schon Gefahr, irgendwann zum Messie zu werden…

Das Collage-Material waren alte Lufthansa-Flugpläne, alte Bordkarten & Flugscheine, Werbung vom Lufthansa Reisemarkt, gestempelte Hintergründe und Landkarten und allerlei Zeitungsausschnitte. Neun Anhänger waren es insgesamt, die beiden Bilder sind nur ein Teil des Ganzen! 

Außer der Sizzix-Stanze mit dem Tim Holtz-Anhänger kamen auch mein Dymo und eine Reihe Stempel zum Einsatz, unter anderem der knuddelige Pilot von Magnolia. Die dazu passende junge Dame, der vor lauter Hektik der Koffer aufgeht, kam auf die Geburstagskarte. Hintergund der Karte ebenfalls gestempelt, Motiv von PSX, glaube ich. Beim Rest weiß ich es nicht…
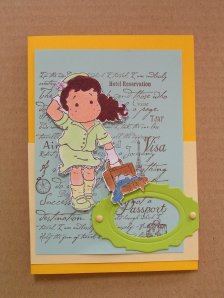
Wie immer, wenn ich fertig bin, fällt mir auf, daß ich viel mehr „layer“ hätte verwenden können. Aber auch wie immer war die Zeit knapp geworden. Ich hatte am Wochenende angefangen und dann unter der Woche abends weitergemacht. Bis ich hundemüde auf die Uhr sah, war es 2 Uhr nachts… Trotzdem bin ich nicht unzufrieden. Meine Freundin mag es nicht so „fusselig“ und so war das eher schlichte Layout genau das Richtige.

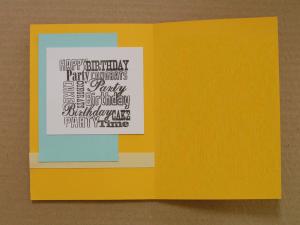
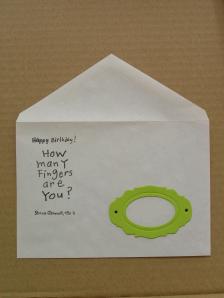
Wenigstens hatte ich auch den Umschlag und die Innenseite der Karte dekoriert. Damit passt sie zur Herausforderung von Creative Inspirations:
 

Mit dem Thema Reisen passen die Tags und die Karte übrigens auch genau zur aktuellen Herausforderung von Challenge up your life!

***

Thursday was my best friends birthday. As a present, she received a self-made voucher for a daytrip or rather a flight to any european city of her choice. I did not want to hand over just a note so I made a little tagbook.

I die-cut the tags with a Tim Holtz-die and put a collage on one side of the tags while the other was covered with cardstock. I did some research beforehand for quite a number of destinations, checking out the first and last flights, how long the transfer from airport to city takes at that place, in short, how much time you have to go sightseeing in the city. I printed these little statistics and mounted them on the cardstock-side of the tags. There were about 8 or 9 cities with enough time for a nice look-around – from B as in Barcelona to V as in Vienna.

The basis for the tags were di-cut from packaging. I like to hoard larger boxes (like cereal or such) to use in projects like this. Sadly, this makes my crafting space look like a recycling center sometimes. Im happy to get cheap crafting materials this way, so it pays off! – Do you have similar tendencies? Do you keep all kinds of stuff because you can recycle it in your crafting projects? I do run the risk of turning into a Messie, so I try to limit myself. Its hard, though – I see so many possible uses…

The materials used in the collage were old Lufthansa timetables, boarding passes and tickets, travel brochures and cut-outs from newspapers and magazines, stamped backgrounds and maps. There were nine tags in total!

In addition to the Sizzix-die from Tim Holtz I used my Dymo and a number of stamps. One of them is the cute pilot from Magnolia. The little stressed-out Lady loosing the contents of her luggage is from Magnolia as well – and adorning the front of the birthday card. The background stamp used on the card is from PSX. I’m not sure about the manufacturers of the rest of the stamps…

Each time I’ve finished I see where I could have added more layers. However, time had been running out (again). I started with these projects on the weekend and finished one evening during the (work) week. When I was finally done and looked at the clock, it was 2 in the morning! – I am not unhappy with the results, anyway. My friend isn’t the type for fussy and fancy cards so it fits her well!

At least I also decorated the envelope and the inside of the card – fitting the current challenge at Creative Inspirations.

And with the theme of travelling, the tags and card really fit in with the challenge at Challenge up your life, too!